Raspberry Pi, also known as Raspberry Pi, is a single-chip computer based on the Linux system that is only the size of a playing card and business card. Developed by the British Raspberry Pi Foundation. According to the official introduction, this is specifically designed for student computer programming education. With the release of Windows 10 IoT, we will also be able to use the Raspberry Pi running Windows. Since its inception, it has been sought after by many computer enthusiasts and makers, and it has been difficult to find one. Regardless of its petite appearance, it has a powerful heart. It has all functions such as video and audio.
It is an ARM-based microcomputer motherboard. As shown in the figure, there are roughly the following places where the Raspberry Pi can be connected: USB, network card, HDMI, power supply, gpio, SD card slot. As a novice, we don't need gpio for the time being. We only need to connect to the power supply/SD card/network. There is not much to say about the power supply, just plug it in, and the remaining two things are slightly more troublesome. The SD card is used as a storage, and we need to write the operating system into it. At the same time, it has a TV output interface for video analog signals and an HDMI high-definition video output interface. The above components are all integrated on a motherboard that is only slightly larger than a credit card, and it has all the basic functions of a PC. Just switch on the TV and the keyboard to perform many functions such as spreadsheets, word processing, games, and high-definition video playback.
Accessory preparation
The Raspberry Pi itself is just a host, we use the Raspberry Pi 3 Model B to develop it. To run, there must be accessories.
power supply. A mobile phone charger with a Micro USB interface can serve as a power source, but the output must be 5V voltage and at least 2A current. It’s okay to use a power bank as a power source.
Micro SD card. The Raspberry Pi does not have a hard drive, and the Micro SD card is the hard drive. The minimum capacity is 8G, and 16G and 32G cards are recommended.
monitor. The Raspberry Pi has HDMI output, and the display must have this interface. If there is an HDMI to VGA adapter cable, then the VGA monitor will also work. However, the monitor is only needed when installing the system, and you can log in with SSH later.
Mouse and keyboard. Raspberry Pi has built-in Bluetooth, USB or Bluetooth wireless keyboard and mouse can be used. Just like the monitor, if the Raspberry Pi has already installed the system, and it is only used as a server, the wireless keyboard and mouse do not need to be equipped.
Write system
You need an SD card with at least 8 Gs. Note that there is a small hole here. Raspberry Pi does not need a large SD card, but a smaller SD card. Also, not all SD cards can work normally, here There is a list of working and non-working SD cards for Raspberry Pi, please check it yourself.
Next, connect the SD card to the computer with a card reader, and write the operating system to the Raspberry Pi on the computer. Since I have only tried writing under Windows, if you are a Mac user, you can only find related processes on the Internet. Under Windows, first download the Raspberry Pi operating system (debain) to the local and decompress it: https://pan.baidu.com/s/1nv31WLz, then download a tool called win32diskimager: http://Linux/2013-10 /91182.htm.
The second step is to open win32diskimager, select the img file decompressed by the operating system debain in the software, select the drive letter of the SD card under "Device", and then select "Write". A box may pop up in the middle. Select but leave it alone, select "Yes", continue the installation.
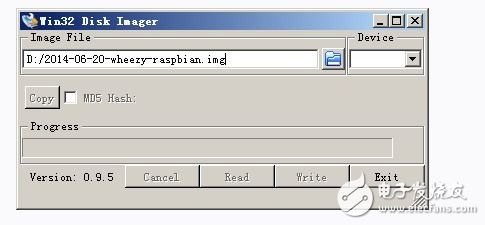
Then start to install the system, according to your SD speed, the installation process may be faster or slower. After the installation is over, a completion dialog box will pop up, indicating that the installation is complete. If it is unsuccessful, please re-insert the SD for installation on software such as firewalls.
It is worth mentioning that after the installation is complete, you will find that the SD card is only tens of M. This is not because the merchant who sells the SD card pits you, but because the partition under Linux cannot be seen under Win, which is a normal phenomenon. If you use the partition software to view the SD card, you can see its true size.
Next, unplug the SD card from the computer and insert it into the Raspberry Pi. At this point, we have completed the installation of the system.
After installing the system, the Raspberry Pi can access the Internet (Wifi or network cable). At this time, you need to check its LAN IP address, you can use the following command.
$ sudo ifconfig
Then, change the system settings, open SSH login (default is forbidden)
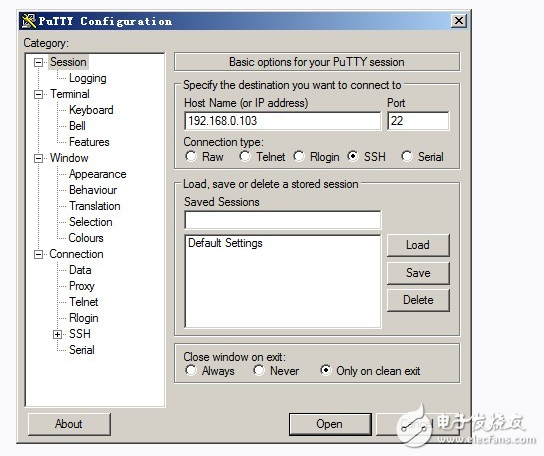
Then, SSH into the Raspberry Pi from another computer. The following command is executed on another computer in the LAN.
As shown in the figure, there is a host named raspberrpi, which is the Raspberry Pi, and its IP address is 192.168.0.103, the problem becomes a lot easier.

We download the remote connection tool Putty and fill in the IP address of the Raspberry Pi
Click Open to come to the login interface
Enter the default account and password of the Raspberry Pi:
Account: pi; Password: raspberry
Click enter and you will see the familiar Linux interface.
Longkou Libo Insulating Material Co.,Ltd. , https://www.sdliboinsulation.com